12 Part Circle Division Tutorial
- Jul 13, 2023
- 4 min read
Updated: Feb 15
Welcome, artists and teachers! Let's learn how to divide a circle into 12 equal parts. It's a pretty simple technique that you'll need when creating a color wheel. Whether you're working with acrylic, watercolor, or colored pencils, knowing how to measure out your wheel will be incredibly useful. Making a wheel in general is so important because you are going to get to see how your personal inventory of colors relate to one another.
Consider this post a step-by-step guide for the video below.
Tag me if you do this at the_paint_lady, I'd love to see your wheel!
0:00-0:13sec
You will need a compass, pencil, ruler, and square piece of paper.
To begin, we need to divide our square piece of paper into 4 equal parts. Take your ruler and measure the entire length of the paper. In my case, it's 12 inches. Match one end of the ruler with the edge of the paper and put a small mark at the half way point, which for me, since my paper is 12, I’ll make a mark at the 6” point.
Next, slide the ruler along that same edge of the paper and make another small mark at 6 inches. These marks will serve as guidelines for this next part.
Now, rotate the ruler so that you can create a line connecting both of the marks you made. Take your pencil and lightly draw a straight line along this guide. This line divides the paper in half.
To create the other dividing line, keep your ruler in the same direction as the line you just drew. Slide it over to one side of the paper, make a mark at 6 inches, and then slide it to the other side of the paper, again making a mark at 6 inches.
Once you have the marks, rotate your ruler to connect the two marks with a straight line and now you have your square paper divided into four equal parts.
0:14-0:26sec
Listen, if you are only going to make it this far in the video, it's all good, you've mastered a foundational technique for precise artwork. This division method can be applied to various art projects and will serve as a valuable skill in your artistic journey.
On to our compass! Open it up and place the pointy part in the center of our two lines. Make your circle any size you like. If can be helpful to move the paper rather that trying to get your hand and wrist to bend in a way it probably doesn't want to, so clear away anything that's around. In this process, your dominant hand has two roles: securing the pointed tip to prevent it from moving and it's also keeping the pencil side of the compass loose and at a bit of an angle so your pencil can glide smoothly against the paper. Meanwhile, your non-dominant hand can rotate the paper.
0:27-0:45sec
Next keep the compass’s measurement, so don’t open or close it. Put the pointy end on one of the four lines that intersect the circle and swing it over so that you can make 2 marks, one on one side of the circle, then swing it around again to make a mark on the other side of the circle.
0:46-1:11sec
So now we have 12 little dashes around the circle, and I’m highlighting the middle point of the circle as well because the next step is to grab our ruler and start making lines that start on one of the little marks, then go through the center, then touch another little mark. Do that for all of them.
At this point you now have your circle divided into 12 equal parts yay!
1:12-
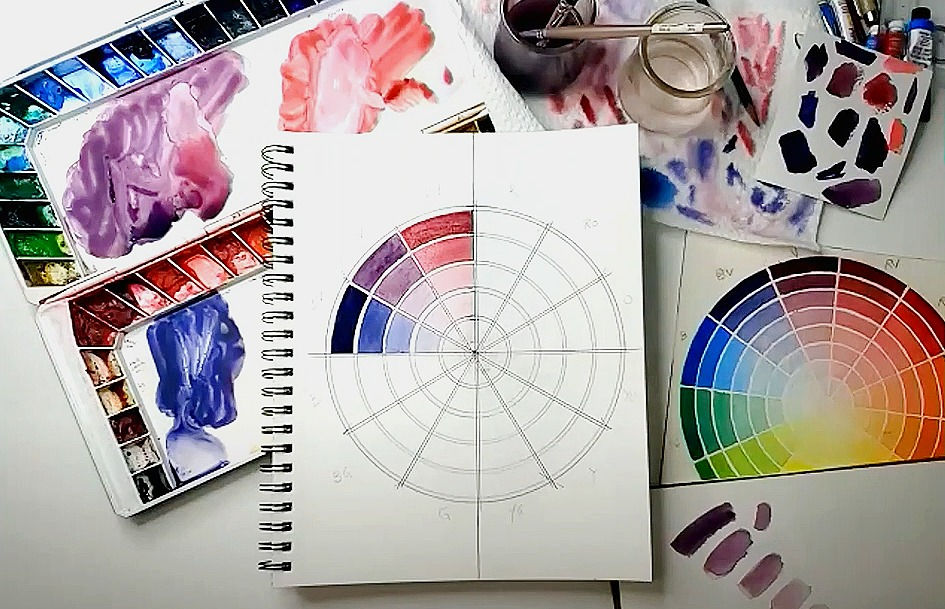
If you want to take it a step further, maybe you are making a mandala, or a color wheel that has tints, let me show you how to add some extra rings.
Take your ruler and measure the line that's from the edge of your circle to the middle point of the circle. Write that measurement down, I want to have 4 equally spaced rings, so im taking that measurement over to my calculator and dividing it by 4. Whatever that is is the measurement for one ring. Align your ruler once again and make small marks along the same line using this new measurement.
Now just use the compass again, put the pointy part in the middle, line up the pencil with your marks, rotate the paper around.
This technique might seem a bit mathematical at first, but with a little practice, it becomes second nature, enabling you to create beautiful, balanced color wheels for any art project.
I would love to see the creations you make using this technique! Tag me on tiktok or Instagram so I can admire your work. the_paint_lady.
I hope this tutorial has been helpful for both the art students and art teachers out there. If you found this video valuable, share it with your other artist friends.


Comments